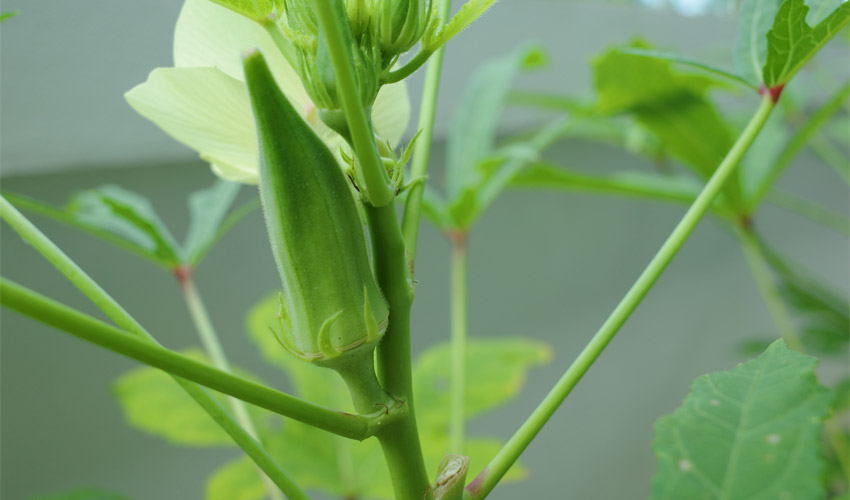
Okra, commonly called ‘Lady Finger’ because of its long, slender pod shape, is a well-loved fruiting vegetable across India and Pakistan. Scientifically known as Abelmoschus esculentus, it is a member of the Malvaceae family, which also includes hibiscus. Although okra thrives in warm climates and is typically a summer crop, farmers in many regions of Asia cultivate it year-round. If you’re wondering how to grow okra, this versatile plant can be cultivated easily with the right conditions and care.
Table of Contents
ToggleOkra Growing Tips
Begin by sowing okra seeds indoors in containers, then shift the seedlings outside once temperatures begin to rise. However, if you’re in a region with consistently warm weather, you can directly plant the seeds in your garden. Okra flourishes under intense sunlight, so select a location that gets a minimum of 5 to 6 hours of direct sunlight daily; otherwise, fruit production will be limited. Just remember one key tip: the warmer the conditions, the more successful your crop will be.
Soil Preparation
Okra thrives in soil with a pH level between 6.5 and 7. You can either get your soil tested professionally or use a DIY soil testing kit at home. If adjusting the pH isn’t ideal, enrich the soil by mixing in organic compost to boost its nutrient content. Nutrient-dense soil helps the plant grow stronger and produce better yields.
Growing Okra From Seeds
You can easily find okra seeds in both red and green varieties. To boost germination, soak the seeds in water overnight before planting. Sow them into small containers filled with potting mix. Maintain steady moisture in the soil until the seeds start to sprout.
If you’re in a warm, frost-free area, you can directly plant the seeds into well-prepared garden beds. For those in cooler regions, start seeds in small trays or punnets during late winter or early spring. Keep them in a warm, sheltered area until the danger of frost has completely passed.
Once the seedlings reach a height of 5 to 10 cm, they’re ready to be moved to larger pots or straight into your garden. Space the plants about 50 to 60 cm apart for healthy growth. In the early stages, young plants require regular watering to establish their roots. Over time, they’ll become more resilient and capable of tolerating drier conditions.
Spread mulch at the base of each plant to control weeds and maintain soil moisture. After 4 to 6 weeks of planting, apply a light dose of slow-release fertilizer for tomatoes, vegetables, and herbs to give your okra plants a nutrient boost.
Planting Okra in the Garden
In regions with cooler weather, start okra seeds indoors during late winter or early spring. Once the danger of frost has passed and nighttime temperatures rise, transplant the seedlings into your garden. In tropical or subtropical zones, it’s best to grow okra during the dry season when conditions are more favorable.
If you’re planting seeds straight in the garden, transplant young okra plants into well-prepared soil, spacing them 50 to 60 cm apart to allow for proper growth.
Spread a layer of mulch to conserve soil moisture and block weed growth. Around 4 to 6 weeks after planting, boost growth with a light application of slow-release fertilizer.
Planting Okra in Pots
Okra also grows well in large containers, provided they have excellent drainage and measure at least 60 cm in both depth and width.
Fill your pot with a rich planting mix. You can directly plant the seeds into the pot or transplant young seedlings; just remember that a single pot may only accommodate one or two plants comfortably.
Place the container in a sunny location and mulch the soil to retain moisture and minimize weed growth. Feed the plants with a small amount of slow-release fertilizer.
Caring
To successfully learn how to grow okra, it all begins with high-quality seeds and the proper care. To keep your okra healthy and productive, water it every morning so the plant stays hydrated throughout the day. Once your seedlings reach about 3 inches, thin them by removing the weaker ones and keeping only the strongest plants; this provides each plant with sufficient space to grow properly. Stay vigilant about weeds and pests. Remove any unwanted growth near your okra, and if bugs appear, apply a homemade natural pesticide to protect the plant without harming the environment.
Pests, Diseases, and Other Problems
Poor growth often results from planting too early in cool conditions. Avoid sowing seeds before the weather warms up, and shield young plants with garden fleece or cloches if you’re growing outdoors.
If your okra develops undersized pods, it’s likely due to a lack of water or nutrients. Make sure the soil remains evenly moist, particularly during dry periods, as this crop is not drought-tolerant.
If you notice fine webbing on the leaves, red spider mites may be the culprit. These pests thrive in dry environments, such as greenhouses or polytunnels. To discourage them, increase humidity by wetting the greenhouse floor, placing pots in shallow trays of water, or setting out a bucket of water to evaporate naturally.
Harvesting
You can expect your first harvest about 45 to 50 days after planting. Pick the pods when they are around 2 to 3 inches long, and continue harvesting every two days to encourage new growth. Use a pair of scissors or gently snap the pods off just above their caps. Each time you harvest, a new pod will begin forming at the same spot. Keep collecting the produce regularly until the plant naturally stops yielding.

